이 글을 자율주행을 위한 Visual SLAM의 4장을 읽고 작성되었습니다.
자율주행을 위한 비주얼 슬램 스터디 4-3 ~ 4-6
자율주행을 위한 비주얼 슬램 스터디 리 대수 미분 및 Sophus Presenter. 김대완
docs.google.com
GitHub - dawan0111/Simple-SE3-Optimization: Simple-SE3-Optimization
Simple-SE3-Optimization. Contribute to dawan0111/Simple-SE3-Optimization development by creating an account on GitHub.
github.com
Robotics에서 로봇의 pose를 아는 것은 매우 중요한 일이다. 간단한 예제를 통해 최적에 로봇의 pose를 구하는 방법에 대해 알아보자.
3차원 world 좌표 $ \mathbf{p} $ 점과 로봇의 pose $ \mathbf{T} \in \text{SE(3)} $ 가 있다고 생각해보자. 로봇이 $ \mathbf{p} $를 관찰하여 관측 노이즈($\mathbf{\omega}$)가 포함된 관측값 $ \mathbf{z} $를 생성한다. 이를 수식으로 표현하면 다음과 같다.
\begin{equation}\mathbf{z} = \mathbf{Tp} + \mathbf{\omega}\end{equation}
관측 데이터와 실제 데이터의 오류는 아래와 같이 표현 가능하다.
\begin{equation}\mathbf{e} = \mathbf{z - Tp}\end{equation}
$ N $개의 점이 있을 때 error가 최소가 되는 로봇의 pose $ \mathbf{T} $를 구해야 한다. 우리는 cost function을 두 벡터의 차에 2-norm으로 아래와 같이 정의할 수 있다.
\begin{equation}\min_{\mathbf{T}}J(\mathbf{T}) = \sum_{i = 1}^{N}{\lVert\mathbf{z - Tp}\rVert}_{2}^{2}\end{equation}
우리는 보통 cost function을 $ \mathbf{T} $에 대하여 Gradient Descent나 Gauss Newton과 같은 Optimization 기법을 적용하여 최적의 값을 찾을 수 있다. 그러나 $ T \in \text{SE(3)} $ 즉 Lie group에서의 미분은 별도의 constraint가 필요하다. (별도의 덧셈 연산 정의 필요)
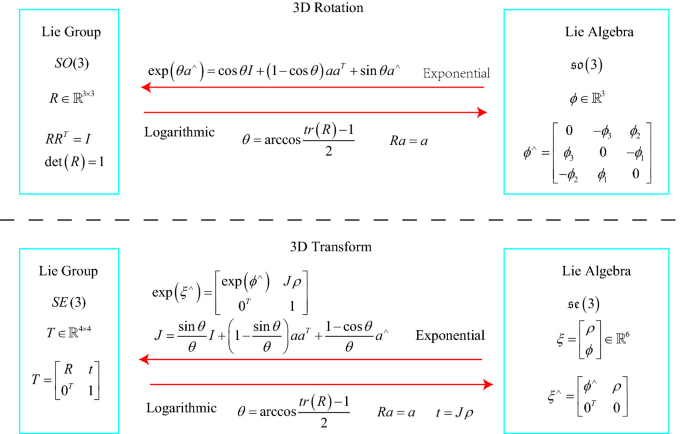
우리는 편하게 미분하기 위해 Exponential Mapping으로 Lie Group을 Lie Algebra로 mapping 한다. Lie Algebra는 덧셈 근사치를 이용해 덧셈 연산에 닫혀있으므로 별도의 constraint 없이 미분이 가능하다.

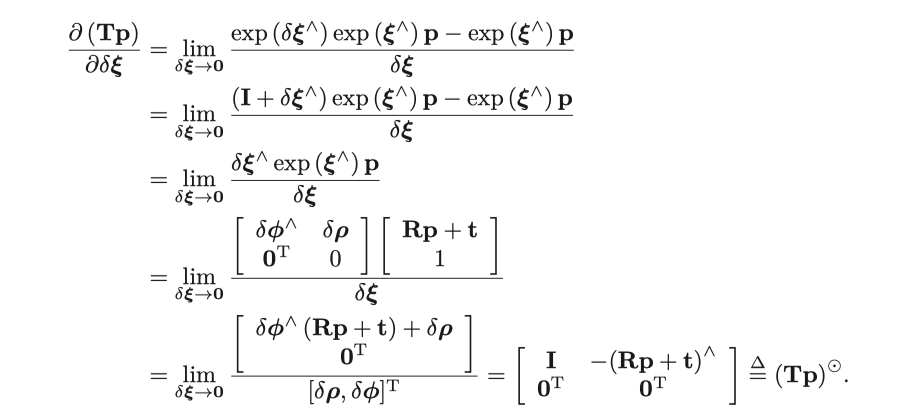
se(3) Lie Algebra 미분 모델
se(3) Lie Algebra를 미분하게 되면 복잡한 형태가 나오게 된다. 우리는 더 실용적이게 pose를 추정하고 싶으므로 섭동 모델을 통해 4x6 Jacobian을 계산할 수 있다.

식에 대한 설명은 아래 PPT 25~28 page를 참고할 수 있다.
자율주행을 위한 비주얼 슬램 스터디 4-3 ~ 4-6.pp
자율주행을 위한 비주얼 슬램 스터디 리 대수 미분 및 Sophus Presenter. 김대완
docs.google.com
이제 미분값을 알게 되었으니 Gauss Newton 법을 통해 cost function을 최소화하는 법을 알아보자.
Gauss Newton을 통한 cost function 최적화
cost function은 error vector의 2-norm 이므로 아래와 같이 다시 작성할 수 있다.
\begin{equation} \min_{\mathbf{T}}J(\mathbf{T}) = \sum_{i = 1}^{N}{\mathbf{e}_{i}(\mathbf{x})^{T}\mathbf{e}_{i} (\mathbf{x})} \end{equation}
Gauss Newton방식은 error가 줄어드는 방향으로 증분량 $ \Delta \mathbf{x} $를 업데이트한다.
\begin{equation} \mathbf{e}(\mathbf{x}+\Delta \mathbf{x})^{\intercal}\mathbf{e}(\mathbf{x}+\Delta \mathbf{x}) \end{equation}
$ \mathbf{e}(\mathbf{x} + \Delta \mathbf{x}) $ 를 $ \mathbf{x} $부분에서 1차 테일러 전개를 사용하면 식은 아래와 같이 근사된다.
\begin{equation}
\begin{aligned}
\mathbf{e}(\mathbf{x} + \Delta \mathbf{x}) \rvert_{\mathbf{x}} & \approx \mathbf{e}(\mathbf{x}) + \mathbf{J}(\mathbf{x} + \Delta \mathbf{x} - \mathbf{x})\\
& = \mathbf{e}(\mathbf{x}) + \mathbf{J}\Delta \mathbf{x}
\end{aligned}
\end{equation}
이때 $ \mathbf{J} $는 위에서 섭동모델로 계산한 결괏값이 된다. error function 전체에 적용하면 아래와 같다.
\begin{equation}
\begin{aligned}
\mathbf{e}(\mathbf{x}+\Delta \mathbf{x})^{\intercal}\mathbf{e}(\mathbf{x}+\Delta \mathbf{x}) \approx (\mathbf{e}(\mathbf{x})+\mathbf{J}\Delta \mathbf{x})^{\intercal}
(\mathbf{e}(\mathbf{x})+\mathbf{J}\Delta \mathbf{x})
\end{aligned}
\end{equation}
전개하고 치환한다.
\begin{equation}
\begin{aligned}
& = \underbrace{\mathbf{e}^{\intercal}\mathbf{e}}_{\mathbf{c}} + 2 \underbrace{\mathbf{e}^{\intercal}\mathbf{J}}_{\mathbf{b}} \Delta \mathbf{x} + \Delta \mathbf{x}^{\intercal} \underbrace{\mathbf{J}^{\intercal}\mathbf{J}}_{\mathbf{H}} \Delta \mathbf{x} \\
& = \mathbf{c}+ 2\mathbf{b}\Delta \mathbf{x} + \Delta \mathbf{x}^{\intercal} \mathbf{H} \Delta \mathbf{x}
\end{aligned}
\end{equation}
위를 전체 에러에 적용하면 다음과 같다.
\begin{equation}
\begin{aligned}
\mathbf{E}(\mathbf{x}+\Delta \mathbf{x}) = \sum_{i}\mathbf{e}_{i}(\mathbf{x})^{\intercal}\mathbf{e}_{i}(\mathbf{x}) = \mathbf{c}+ 2\mathbf{b}\Delta \mathbf{x} + \Delta \mathbf{x}^{\intercal} \mathbf{H} \Delta \mathbf{x}
\end{aligned}
\end{equation}
1차 미분을 통하여 극소값을 구한다.
\begin{equation}
\begin{aligned}
\frac{\partial \mathbf{E}(\mathbf{x}+\Delta \mathbf{x})}{\partial \Delta \mathbf{x}} \approx 2\mathbf{b} + 2\mathbf{H} \Delta \mathbf{x} = 0
\end{aligned}
\end{equation}
이를 정리하여 다음과 같은 공식을 도출한다.
\begin{equation}
\begin{aligned}
\mathbf{H}\Delta \mathbf{x} = - \mathbf{b}
\end{aligned}
\end{equation}
구한 $ \Delta \mathbf{x} $를 $ \mathbf{x} $에 업데이트한다.
\begin{equation}
\begin{aligned}
\mathbf{x} \leftarrow \mathbf{x} + \Delta \mathbf{x}
\end{aligned}
\end{equation}
아래 링크를 참조하여 작성하였다. 더욱 자세한 설명을 확인 가능하다.
[SLAM] 에러와 자코비안 정리(Errors and Jacobians) 정리 Part 1
1. Introduction본 포스트에서는 SLAM에서 사용하는 다양한 에러에 대한 정의 및 이를 최적화하기 위해 사용하는 자코비안에 대해 설명한다. 본 포스트에서 다루는 에러는 다음과 같다.Reprojection error
alida.tistory.com
C++ Implement
C++의 Eigen과 Sophus 라이브러리를 사용하여 간단하게 GaussNewton 최적화 기법으로 pose 최적화를 구현해 보자.
Landmark 실제값과 관측값 정의
landmark의 실제 위치와 관측 노이즈가 포함된 관측값을 N개 추가한다.
std::vector<Eigen::Vector3d> landmarks;
std::vector<Eigen::Vector3d> measures;

landmarks.emplace_back(0.9, 1.0, 1.0);
landmarks.emplace_back(1.0, 2.0, 1.2);
landmarks.emplace_back(1.1, 3.0, 1.0);
landmarks.emplace_back(1.2, 3.5, 1.1);
landmarks.emplace_back(1.5, 3.7, 1.4);

for (auto &landmark : landmarks) {
Eigen::Vector3d noise = Eigen::Vector3d::Zero();
noise(0) = dist(rng1);
noise(1) = dist(rng1);
noise(2) = dist(rng1);
measures.emplace_back(landmark + noise);
}
Cost function 정의
월드 좌표계 기준 관측값과 측정값의 차이 vector의 2-norm을 이용하여 에러함수를 정의한다. (4)번 식을 코드로 구현한 것이다.
double costFunction(const std::vector<Eigen::Vector3d> &measures,
                    const std::vector<Eigen::Vector3d> &landmarks,
                    const Sophus::SE3<double> &T) {
  double cost = 0.0;
  for (int i = 0; i < landmarks.size(); ++i) {
    auto homogenousMeasure = getHomogenous(measures[i]);
    auto homogenousLandmark = getHomogenous(landmarks[i]);
    cost += pow((homogenousMeasure - T * homogenousLandmark).norm(), 2);
  }
  return cost;
}
Gauss Newton 정의
Jacobian matrix는 섭동모델 결괏값을 이용한다. 그 후 $ \mathbf{H} $의 inverse을 구하기 위해 QR decomposition으로 least squares 문제를 해결한다. 결과로 1 x 6 vector를 반환한다. (Lie Algebra)
Vector6d gaussNewton(const std::vector<Eigen::Vector3d> &measures,
                     const std::vector<Eigen::Vector3d> &landmarks,
                     const Sophus::SE3<double> &T) {
  Eigen::Matrix<double, 6, 6> H = Eigen::Matrix<double, 6, 6>::Zero();
  Vector6d b = Vector6d::Zero();
  Eigen::Matrix3d informationMatrix = Eigen::Matrix3d::Identity();

  for (int i = 0; i < measures.size(); ++i) {
    auto measure = measures[i];
    auto landmark = landmarks[i];

    Eigen::Matrix<double, 3, 6> jacobian = Eigen::Matrix<double, 3, 6>::Zero();
    Eigen::Vector3d so3 = Eigen::Vector3d::Zero();
    so3 = T.rotationMatrix() * landmark + T.translation();
    auto error = so3 - measure;

    jacobian.block(0, 0, 3, 3) = Eigen::Matrix3d::Identity();
    jacobian.block(0, 3, 3, 3) = Sophus::SO3d::hat(so3) * -1.0;

    b += error.transpose() * informationMatrix * jacobian;
    H += jacobian.transpose() * informationMatrix * jacobian;
  }

  Vector6d dx = H.colPivHouseholderQr().solve(-b);
  return dx;
}
반복적으로 수행
반복적으로 수행하여 최적의 로봇 pose를 구한다. 이때, gaussNewton 반환이 Lie Algebra 이므로 Lie Group으로 mapping 시킨 뒤 행렬 곱셉으로 업데이트를 한다. (Exponential Mapping)
for (int i = 0; i < 10; ++i) {
    std::cout << "#Iteration " << i << "." << std::endl;
    auto cost = costFunction(measures, landmarks, T);
    std::cout << "cost: " << cost << std::endl;

    auto dT = gaussNewton(measures, landmarks, T);
    T = Sophus::SE3d::exp(dT) * T;
    std::cout << "T: " << std::endl;
    std::cout << T.matrix() << std::endl;
}
실행 결과
초기 로봇의 pose를 Identity Matrix로 정의한 뒤에 반복적으로 pose를 업데이트한다. 반복할수록 cost값이 최소화하는 방향으로 최적화되는 것을 확인 가능하다.

결론
가장 간단한 예시로 SE(3)를 최적화하여 최적의 pose를 구하는 법을 알아봤다. Lie Theory가 왜 사용되는지, 어떻게 최적화할 수 있는지 직관적이게 알 수 있어서 작성하면서도 도움이 되었다.
발표 자료
자율주행을 위한 비주얼 슬램 스터디 4-3 ~ 4-6.pp
자율주행을 위한 비주얼 슬램 스터디 리 대수 미분 및 Sophus Presenter. 김대완
docs.google.com
전체 코드 (github)
GitHub - dawan0111/Simple-SE3-Optimization: Simple-SE3-Optimization
Simple-SE3-Optimization. Contribute to dawan0111/Simple-SE3-Optimization development by creating an account on GitHub.
github.com
'Robotics' 카테고리의 다른 글
| IMU Angular velocities 값으로 Quaternion 업데이트 방법 (0) | 2024.01.19 |
|---|---|
| 3D Rigid Body Transformation & ROS에서 회전을 표현하는법 (0) | 2024.01.07 |


